Posts Tagged ‘How To’

Introduction

GMC’s flawed execution of wireless charging rendered the wireless charger in my 2017 Canyon Denali useless for charging my iPhone X.  Luckily, the 2018 GMC Sierra charger can be retrofitted into the 2017 Canyon with a few modifications.

Required Items
  • GMC Silverado Wireless Charger, part number 13521066. I purchased from gmpartsdirect.com and they did NOT require a Silverado VIN.
  • T15 Torx Screwdriver
  • Plastic Trim Removal Tools
  • Dremel Tool with cutting bit and sanding bits.
  • Black Electrical Tape
  • Adapter harness from pgamboa on gm-trucks.com.  Phil was great to work with.  Send him a private message on gm-trucks.com to order.

Continue reading for the instructions.

(more…)

IMG_0564

Installing an Icom ID-5100 in a 2017 GMC Canyon Denali

Introduction

This post documents how and where I installed my Icom ID-5100 into my brand new 2017 GMC Canyon Denali. My goal was a very clean, professional looking install with no wires cluttering up the interior of my truck. I’ve always been of the mind that if you are going to do something, do it right.  This requires you to drill holes, quite a few of them.

Planning:

I spent a lot of time figuring out exactly where each component of the radio was going to go. I then spent considerable time figuring out how all of the wires would travel, unseen throughout the truck. I took apart sections of the truck to see how I could get everything where I wanted it to go. A set of trim removal tools are worth their weight in gold for this! This process took me two months. I’m a measure twice, cut once kind of guy. It is also a brand new truck and I did not want to get half way through my install only to figure out my plan was not feasible. This install will require you to drill holes. There is no way around a clean install without drilling holes.

End State

When this install is finished, the components will be in the following locations:
– Radio Body – under the rear passenger seat with easy access to the SD Card
– Antenna – center of the roof with an NMO antenna
– Control Head – in the cubby hole forward of the gear shift. The RJ12 cable will be plugged into a custom keystone installed next to the cigarette lighter.
– Microphone – Attached to the left side of the front console face plate. The microphone is plugged into a custom RJ45 Keystone installed next to the USB port and aux port.
– External Speaker – underneath and in front of the rear seat.

(more…)

This post will document how to setup the DSTAR Commander image for use on a Raspberry Pi / DVMEGA hotspot.  I use a Mac.  Theses instructions demonstrate how I set up my hotspot using a Mac.  These hotspots are great to use and enable you to talk across the globe using an HT on low power.

Outline:
  1. Burn image to SD Card
  2. Boot your Pi and VNC into it
  3. Set up DSTAR Repeater
  4. Set up ircddb Gateway
  5. Set up text and email of system information
  6. Create Remote Control App
  7. Reboot and Test
  8. Secure your Pi (Change user password and VNC password)
  9. Change the Hostname of your Pi
  10. References
What you will need:
  • 16 GB or greater SD card. I love this Lexar card. I don’t recommend PNY. The one I bought failed in a couple of months.
  • SD Card Reader (The USB reader that came with my Lexar works great).
  • G4KLX image. I have used many of them and prefer DSTAR Commander.
  • A VNC Program. I use Jump Desktop on the Mac and iOS they all sync together and work great!
  • The Unarchiver application, free in the Mac App Store.
  • Software that will let you see devices connected to your network via ethernet. If, like me, you are using an Apple Time Capsule the Airport utility will only show you devices connected wirelessly. Use the iPhone app Fing to get the ip and MAC address of your Pi.

(more…)

Introduction

I love the Raspberry Pi! I am currently using one as a local DSTAR hotspot. It works great. I have tried several different images (Maryland-DSTAR, Western, and DSTAR Commander). I think I have settled on DSTAR Commander. I think I finally have everything working exactly how I want it to.

When making tweaks to the system, it is very important to make a backup of your current system so that you can easily go back to where you started if you messed something up. Additionally, if your SD Card fails (and it WILL), having a backup will enable you to quickly get your system back online.

I used to have to shut down the pi, pull the SD Card out, find my SD Card adapter, plug it into my Mac, make a backup, and then reverse the process to get my system online again.  Those days are over. You can make a backup of your pi and have the backup written to your regular PC all from the command line. Here is how to do it.

Bottom Line Up Front:

From your local machine, run the remote backup command:

ssh pi@xx.x.x.xx "sudo dd if=/dev/mmcblk0 bs=1M | gzip -" | dd of=~/Desktop/pibackup.gz

If you ever need to use your back up you cannot do it remotely (at least that I know of).  You will need to insert the SD card into your local machine and run the following commands:

diskutil unmountDisk /dev/disk#
gzip -dc ~/Desktop/pibackup.gz | sudo dd of=/dev/rdisk# bs=1m conv=noerror,sync

Continue reading if you need much more detailed instructions on what this command does, what each piece of the command means, and how to get all of the necessary inputs.

(more…)

I recently bought a new hybrid SSD drive for my MacBook Pro 5,1.  I’m dual booting Mac OS X and Ubuntu 11.04 64-bit.  I’ve made a lot of changes to my Ubuntu system and I really did not want to go through the hassle of reinstalling Ubuntu and redoing the changes.  I needed a way to clone the entire hard drive to include the partition schemes, operating systems and files.

I used the Unix command “dd” to accomplish this task.  Using dd I cloned my old (internal) drive to the new (external) drive.  Both systems remain bootable and all files and permissions remain intact.  dd does not care what operating system(s) are on the drive or how many partitions you have.  It is a bare-metal duplication from one drive to the other.

I did a lot of research on the ‘net to learn how to do this.  I am writing this post to help others that may find themselves in the same situation.  Additionally, this will capture everything I’ve learned so that I can refer back to it the next time I have to do this.

Like my other Unix posts, let me alert you to to the EXTREME geekiness of this post.  If Unix commands are not your thing, don’t waste your time reading the rest of this.

One of the reasons I enjoy working with Unix on Mac OS X & Ubuntu is that it provides a playground for me to learn how my computer works. I get immense joy when I string a Unix command together and it works. (My wife would be rolling her eyes right now.)

Reqired Items

  1. Bootable backup of your working system(s) and files. (The unofficial nick-name for dd is “Data Destroyer” because if you type the command wrong, you will nuke your entire system).

  2. Your new hard drive.  I formatted mine before this process although I don’t think this is required.

  3. An external enclosure for your new drive to reside during the operation.

Preparation

  1. Disconnect from the internet to prevent Dropbox, MobileMe or Mail from changing your system while going through this process.

  2. Backup your system; especially your important files. It’s too easy to destroy your system.

  3. Boot from your backup. All of this was done with OS X but could also be done from Linux.

  4. Attach the hard drive you want to clone your drive to.

  5. The drive will mount. Unmount it (do not eject) using disk utility; leave it connected via USB or FW.

Clone Your Hard Drive

  1. Open a terminal window and run the following command:

diskutil list

It will output the following:

$ diskutil list
/dev/disk0
#:                       TYPE NAME                    SIZE       IDENTIFIER
0:      GUID_partition_scheme                        500.1 GB   disk0
1:                        EFI                         209.7 MB   disk0s1
2:                  Apple_HFS JangoFett               469.6 GB   disk0s2
3:       Microsoft Basic Data                         9.3 GB     disk0s3
4:       Microsoft Basic Data                         20.0 GB    disk0s4
5:                 Linux Swap                         1.0 GB     disk0s5
/dev/disk1
#:                       TYPE NAME                    SIZE       IDENTIFIER
0:      GUID_partition_scheme                        
500.1 GB   disk1
1:                        EFI                         209.7 MB   disk1s1
2:                  Apple_HFS Backup                  499.8 GB   disk1s2
/dev/disk2
#:                       TYPE NAME                    SIZE       IDENTIFIER
0:      GUID_partition_scheme                        *500.1 GB   disk2
1:                        EFI                         209.7 MB   disk2s1
2:                  Apple_HFS BobaFett                499.8 GB   disk2s2

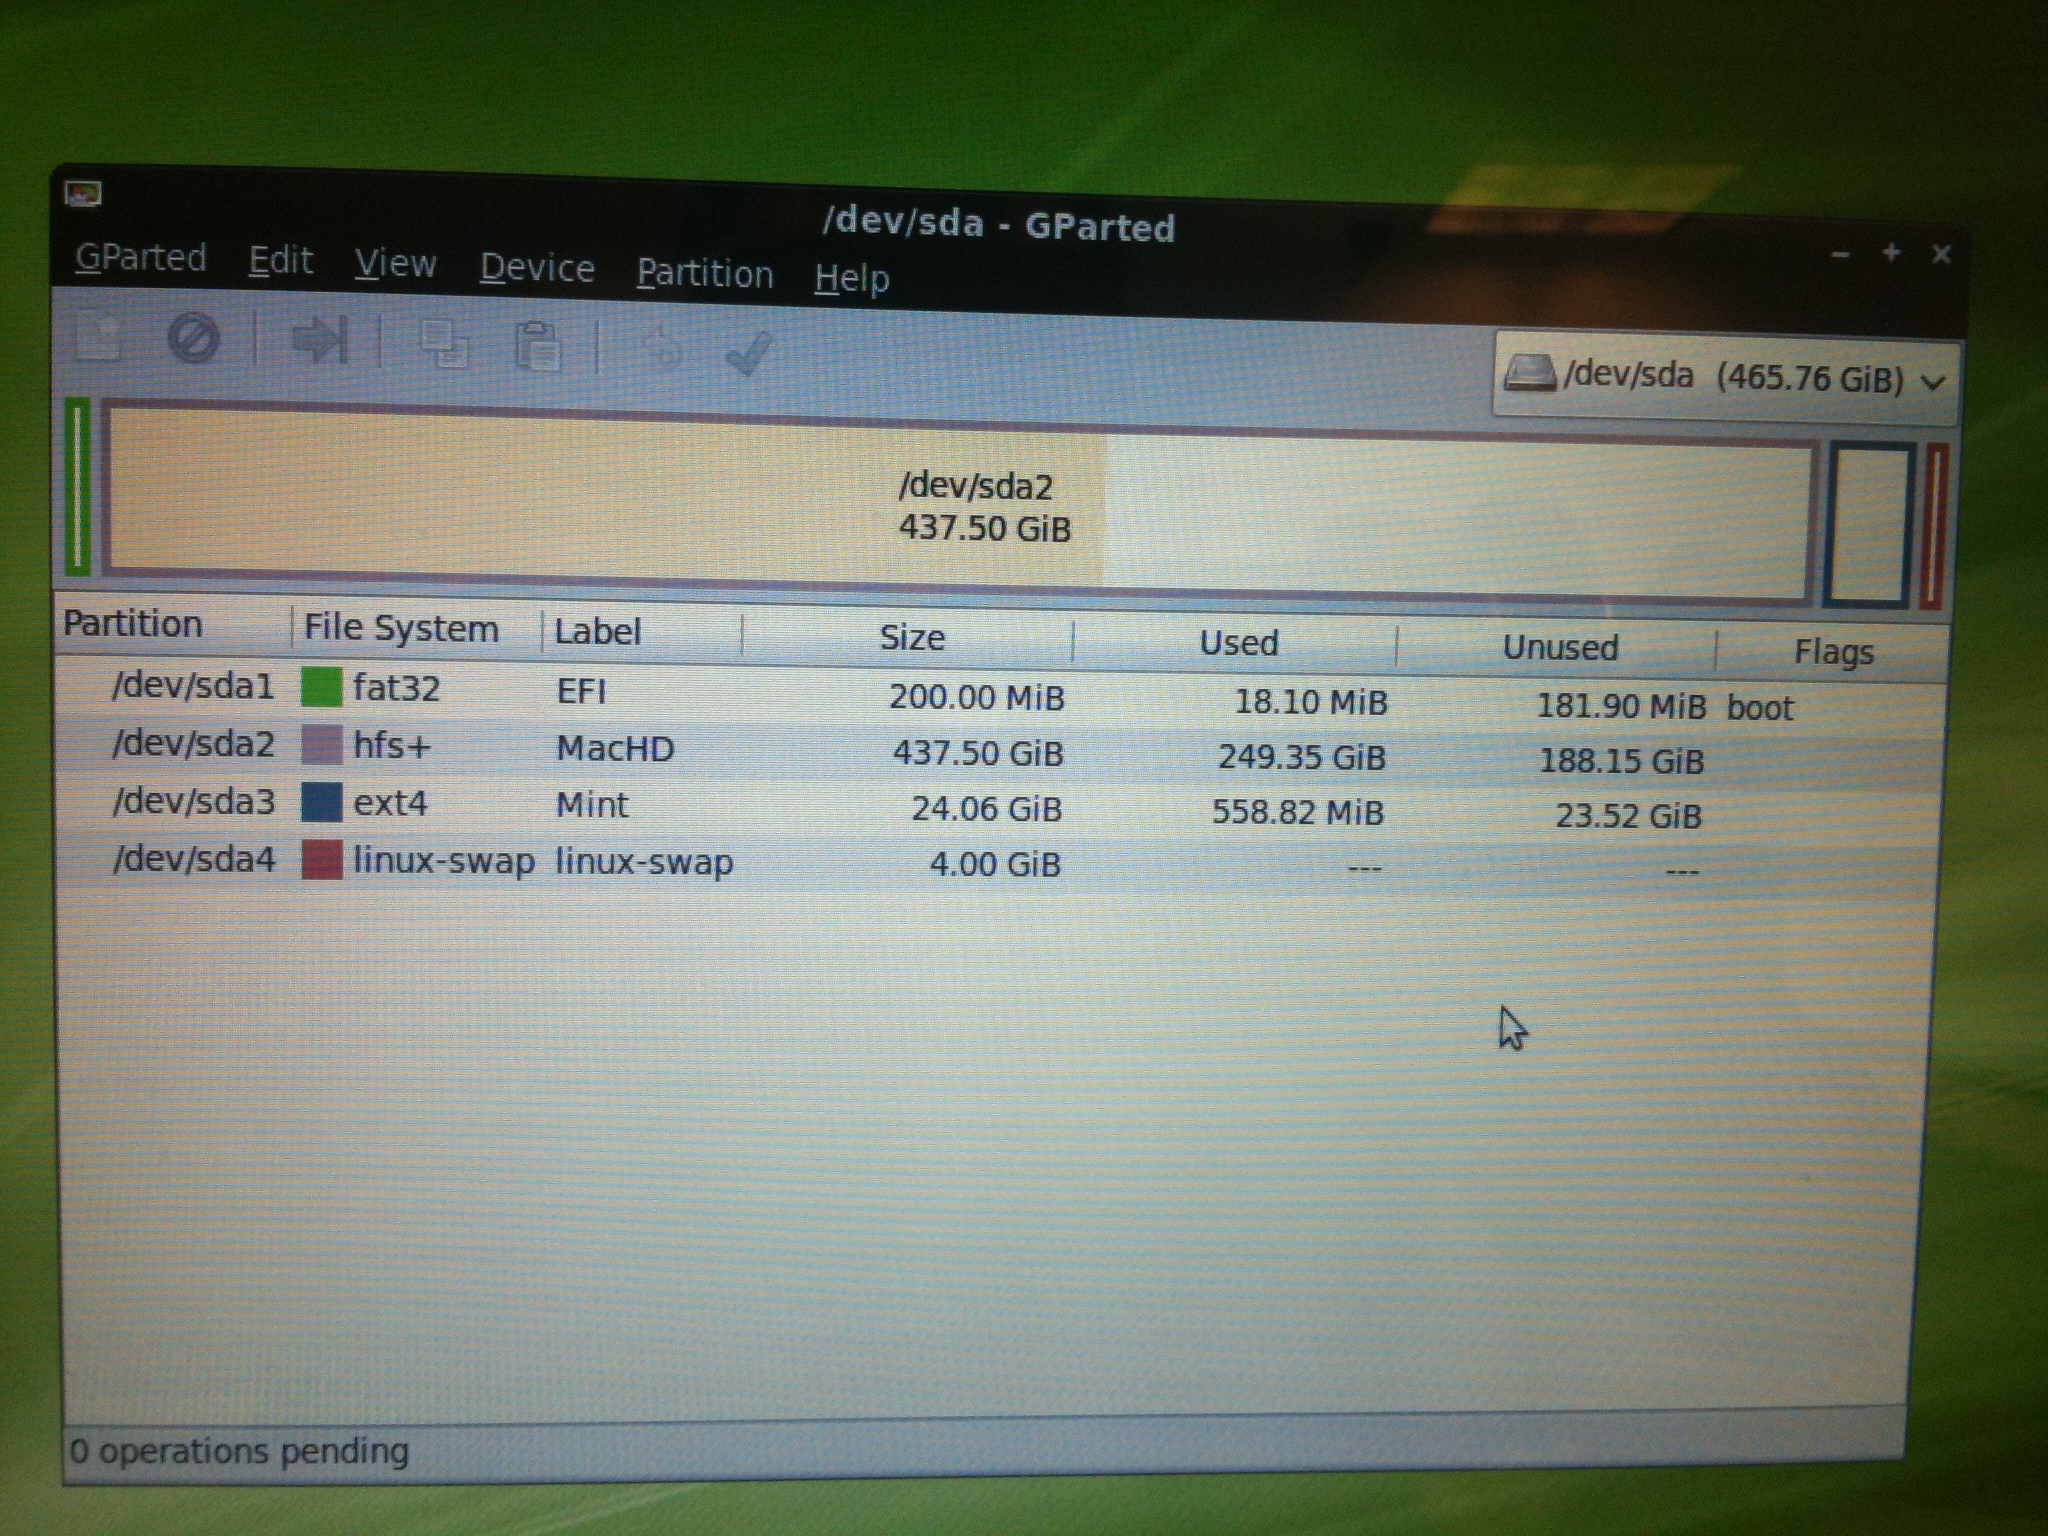
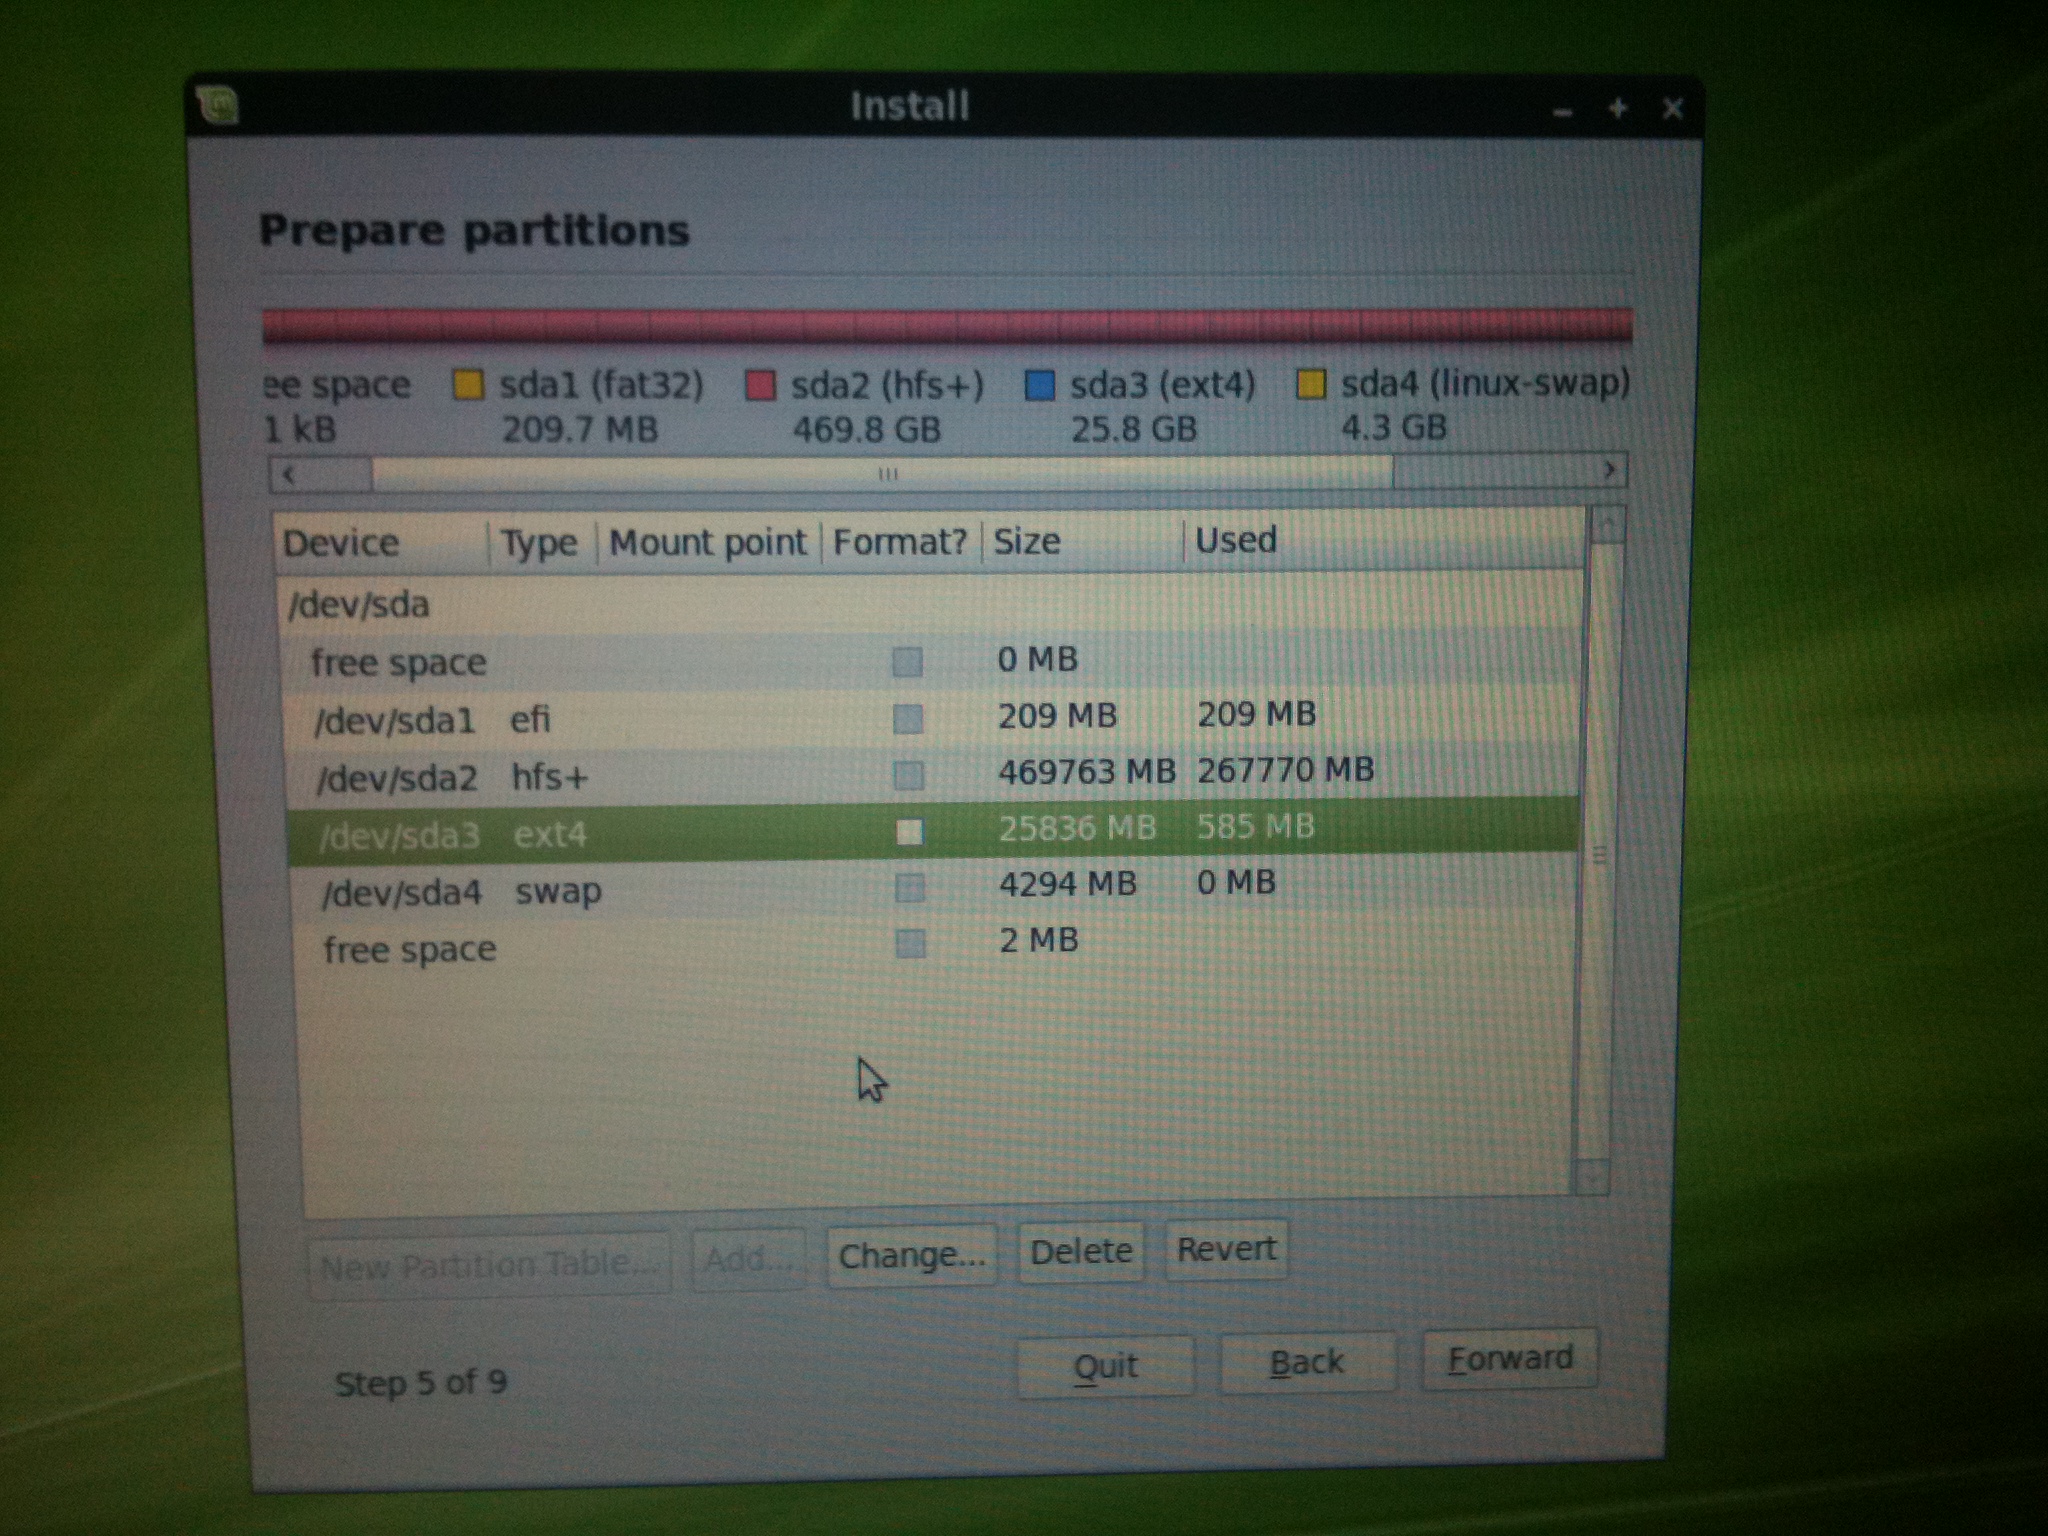
Backup (disk1) is the drive I have booted from.  JangoFett (disk0) is the SOURCE and BobaFett (disk2) is the TARGET.  EVERYTHING on the target drive will be erased during the operation.  Note that we want to clone the entire disk so we use disk0.  If we only wanted to clone the JangoFett partition to the BobaFett partition, disk0s2 would be the source and disk2s2 would be the target.

  1. Run the following command:

   sudo dd if=/dev/rdisk0 of=/dev/rdisk2 bs=128m conv=noerror,sync

  • sudo  = Super User Do; runs the command as root or the super user
  • dd   = Data Description; utility used to copy and convert data
  • if   = input file (the SOURCE or the drive you want to copy FROM) which is /dev/rdisk0
  • of   = output file (the TARGET or the drive you want to copy TO) which is /dev/rdisk2
  • bs   = the block size 128m; you can experiment with smaller or larger numbers depending upon what you are doing.
  • conv = tells dd not to worry about errors noerror and sync says write 0’s to the target if you can’t read the data.

Note: I use rdisk0 and rdisk2 instead of disk0 and disk2.  rdisk is the block device; disk is the character device.  The command works using both but seems to run faster when using rdisk.  I’m sure my understanding is probably off.  Again, I’m not an expert.  I know just enough to be dangerous.

When you press enter you will be asked for your password; enter it and hit return.

Like most Unix commands, there is no feedback, no progress bar, nothing.  The cursor just sits there and blinks at you (mocking you) while it follows your instruction.  Don’t fret. Let it run it’s course. When it completes you will see a completion message telling you how many blocks and files that were copied. This could take HOURS (it will be significantly less time than re-partitioning, re-installing and editing everything).

Getting the status of dd

As my wife would tell you, I’m not very patient.  I surely loathe not knowing what is going on.  Fortunately, this provided another Unix learning opportunity.  Computers are machines, they do EXACTLY what we tell them to do (mostly).  You just have to know how to ask.  The commands below assume that dd is currently running.

The Easy Way (works on a Mac):

Press “CTRL + T”

The Hard Way:

  1.  Open a new (2nd) Terminal window.

  2.  Enter the following command:

   ps -ac | grep dd

  • ps   = Process Status; displays all of the processes that have controlling terminals
  • -ac  = Two options to the ps command.  a tells ps to show your processes and other users’ processes; c tells ps to just list the executable name of the process (dd) instead of the entire command.
  • |    = “pipe” diverts output from the previous command to the next command
  • grep = Global Regular Expression Print; searches for a pattern from what is inputed to it
  • dd   = the pattern we are searching for; since we ran the command “dd” we want to search for that pattern.

The command will return something like the following:

$ ps -ac | grep dd
355 ttys000    1:39.76 dd

The first number is the PID or Process ID of dd.  We need the PID in order to ask dd its current status.  We get the status by running the following command:

   kill -INFO 355

  • kill  = is the command used to terminate or signal a process.  
  • -INFO = is an option to the kill command; it tells your computer “don’t terminate the process, just tell me what’s going on.”
  • 355   = the PID of dd; the process whose status we want to know 

The status of dd is written to the FIRST terminal window (where dd is running):

1266+0 records in
1265+0 records out
169785425920 bytes transferred in 4582.019038 secs (37054719 bytes/sec)

Run the command as many times as you want.  You’ll see the the numbers increasing with each successive instance of the command.

Explaining the Status Message

1266 is the number of records dd has read from the source (disk0); 1265 is the number of records dd has written to the target (disk2).  A record is a block.  The size of that block is 128m (128 Mega Bytes) because that is what we instructed dd to use when we ran it.

For those that don’t know, there are 1024 bytes in a kilobyte; 1024 kilobytes in a megabyte; and 1024 megabytes in a gigabyte.

Ergo: 1265 (records) x 128 (megabytes/record) x 1024 (kilobytes/megabyte) x 1024 (bytes/kilobyte) = 169,785,425,920 bytes (which is exactly the number of bytes that have been transferred).

It took dd 4,582 seconds to make that transfer which is about 1 hour and 16 minutes (4582 / 60).  Knowing that we have a 500GB hard drive we can estimate that it is going to take about 4 hours to clone the drive.

Completion

When dd completes the cloning process and exits, it will display its’ final status message.

dd: /dev/rdisk2: short write on character device
dd: /dev/rdisk2: Input/output error
3726+1 records in
3726+1 records out
500107862016 bytes transferred in 14584.393113 secs (34290619 bytes/sec)

The error message states that the last block was “short” meaning it wasn’t a full 128MB block.  The “+1” (3726+1) is the number of errors.  Only one error which was the short write at the end.  Nothing to worry about.

At this point the drives are EXACTLY the same; bit for bit.  To verify this run the following command:

    diskutil list

Returns the following output:


/dev/disk0
#:                       TYPE NAME                    SIZE       IDENTIFIER
0:      GUID_partition_scheme                        500.1 GB   disk0
1:                        EFI                         209.7 MB   disk0s1
2:                  Apple_HFS JangoFett               469.6 GB   disk0s2
3:       Microsoft Basic Data                         9.3 GB     disk0s3
4:       Microsoft Basic Data                         20.0 GB    disk0s4
5:                 Linux Swap                         1.0 GB     disk0s5
/dev/disk1
#:                       TYPE NAME                    SIZE       IDENTIFIER
0:      GUID_partition_scheme                        
500.1 GB   disk1
1:                        EFI                         209.7 MB   disk1s1
2:                  Apple_HFS Backup                  499.8 GB   disk1s2
/dev/disk2
#:                       TYPE NAME                    SIZE       IDENTIFIER
0:      GUID_partition_scheme                        *500.1 GB   disk2
1:                        EFI                         209.7 MB   disk2s1
2:                  Apple_HFS JangoFett               469.6 GB   disk2s2
3:       Microsoft Basic Data                         9.3 GB     disk2s3
4:       Microsoft Basic Data                         20.0 GB    disk2s4
5:                 Linux Swap                         1.0 GB     disk2s5

You now have a perfect clone of your hard drive!

Remove the clone from the external enclosure, pop it into your computer and voila!  All systems running perfectly with no data loss.

If you want to boot from the clone while it is attached via FireWire or USB there are other some other things that need to be done.  That will have to wait for another post.  I’m still figuring that out.

If this was helpful, or you spot an error, please leave a comment!

Don’t Be Stupid

Posted: 2011-05-20 in Rants
Tags: , ,

MacDefender is not a virus.  It's a trojan AND an IQ test.  How do you get MacDefender?  By being stupid.  Here are the stupid things you have to do in order to get SUCKERED by MacDefender.

1.  Go to a website of ill repute.
2.  Believe the redirected website that claims your Mac is infected by a virus. (hint: it's not)
3.  Have your browser set to automatically open "safe" files.
4.  Click on "continue" when the MacDefender installer automatically opens.
5.  Enter your administrator's password to install MacDefender to remove the virus that is not really there. (YOU are doing all of this).
6.  Really believe that your Mac is infected with a virus because porn websites are automatically opening up.
7.  Enter your credit card number into MacDefender.

Everything above is a choice YOU have to make.  You can stop at any time through # 6.  Once you complete # 7, MacDefender also revokes all cool points, self-esteem, degrees conferred, etc.

You are officially stupid.  Just because it is written down doesn't mean it's true.  Think for yourself.

One more thing…

After giving MacDefender your credit card number, Steve Jobs shows up at your door step with an Army of Apple Geniuses.  They take away all of your Apple gear.  And leave you with a Dell computer running Windows (you're not smart enough for Linux), a Zune, and a Blackberry.

The Unofficial Apple Weblog has an excellent article on MacDefender and how to avoid it, or get rid of it.  Read it.  You'll be smarter for it.
http://www.tuaw.com/2011/05/19/macdefender-malware-protection-and-removal-guide/

WARNING:  Extreme Geek-Alert!


I’ve been dual-booting Mac OS X and Ubuntu Linux for a while.  Recently the upgrade from Ubuntu 9.10 to 10.04 failed.  It failed so bad that my computer was unbootable.  During the install process, Ubuntu loaded the boot loader to my Mac OS X partition causing the Mac and Ubuntu partitions to overlap.  After trying several unsuccessful “fixes” I had to resort to the nuclear option.  I formatted the internal hard drive and cloned from one of my two back-ups.


I was going to do a fresh install of Ubuntu 10.04 but decided to try out a different flavor of Linux.  The one I chose was Linux Mint.  It’s basically Ubuntu but looks a lot nicer (IMHO).


The Mac Installation information in the Ubuntu Community  is not very well maintained or updated for Mac specific installs.  I decided I would write a post that outlines exactly what I did to get Linux Mint and Mac OS X working on my MacBook Pro 5,1.  I imagine that this would also work for Ubuntu as well.


Below is the exact process I used to get a successful dual-boot.  I hope this helps you.


Normal disclaimer:  I am not a computer scientist. I am an amateur and a hacker.  Everything I’ve learned is from trial and error, a lot of error.


PREPARATION:


1.  Backup your system by making a bootable clone of your hard drive.  I use SuperDuper.  Carbon Copy Cloner is also excellent and FREE.
2.  Boot from your backup to ensure it is working properly.
3.  Make another backup of your system.
4.  Boot from your second backup to ensure it is working properly.
5.  VERIFY YOU HAVE STEPS 1-4 COMPLETE.  I’ve done dual-boot set ups a few times.  The nuclear option (formatting your hard drive and cloning from a back-up) is often required.  If you value your data, make a back-up…or two.
6.  Connect to the internet via Ethernet.  You’ll need to have an ethernet connection to update your hardwire drivers.  Additionally during the install, if you have an internet connection, the installer will download and install a few other packages.


INSTALLATION:


1.  Download the Linux Mint 9 dmg and burn it to a DVD-R.  I used this one.  32-bit i386.


2.  Verify the MD5 Checksum.  Open a terminal window and enter the following command:


MD5 /Users/yourusername/Downloads/linuxmint-9-gnome-dvd-i386.iso


Wait a minute…and the output will reveal the following:


MD5 (/Users/yourusername/Downloads/linuxmint-9-gnome-dvd-i386.iso) = 4d96965a00135a00f7eb4602a8f4b0f1


If you downloaded the .iso to your Downloads folder change “yourusername” to your user name and the command will output a string of numbers and letters.  It should match the MD5 checksum on the download page.  If they match, continue.  If not, re-download until the MD5 checksum matches.  The MD5 checksum MUST match.  If it doesn’t either the code has been altered or you had a bad download.


3.  Use Disk Utility to burn the .iso to a DVD-R.  I used the default settings.


4.  Download and install rEFIt.


5.  Reboot your computer TWICE for rEFIt to take effect.  you will know it is installed correctly when you see the rEFIt menu upon initial startup.


Img_1047


6.  Repartition your disk using Disk Utility.  I created 30GB of Free Space.  Most websites say to use Bootcamp Assistant.  I used Disk Utility and it worked fine.  Click the “+” sign, change the format in the drop down from HFS+ journaled to Free Space.   Hit apply.


7.   Insert the Linux Mint LiveDVD that you just burned into your DVD drive.  Reboot while holding down the “C” key to boot from the Linux Mint DVD.


8.  Open the GParted application.  Create two partitions.  Your Linux partition formatted as ext4 and the swap partition.  I created my linux partition so that 4096MiB of free space was left for my swap partition.  UNCHECK “Round to cylinders” so that you have no free space between partitions.  Next, add the final partition.  Ensure it is formatted as “Linux-Swap.”  Hit “apply” to make the changes.  You should now have four partitions.


/dev/sda1 EFI
/dev/sda2 MacOSX
/dev/sda3 Linux
/dev/sda4 Swap


Img_1045


9.  Exit GParted and double-click the “Install Linux Mint” icon to begin the installation process.  Follow the instructions until you get to Step 4.


10.  When you get to Step 4, choose “Specify Partitions Manually.”  Proceed to Step 5.


11.  Step 5, Specifying partitions.


a.  Select /dev/sda3 and press “Change…”


Img_1048


b.  Choose ext4 Journaling; CHECK the “Format” box; mount at /


Img_1049


c.  No change to Swap


Img_1050


d.  Proceed with installation until you get to Step 8.


12.  At Step 8, click “Advanced…” and choose to install boot loader at /dev/sda3.


Img_1051


13.  Proceed with the installation!  When installation is complete  DO NOT hit “Restart.”  Instead click on “Continue Testing.”  Then in the Menu click quit, then click restart.


14.  Upon restart, rEFIt should load.


Img_1054


15.  Use the down arrow key to launch the partition tool.  When I did this, the partitions were already in Sync and there was no need for rEFIt to Synchronize!  Sweet!


Img_1053


16.  When I chose Linux from rEFIt it did NOT start up.  I had to power down by holding the Power button.  I then restarted and held down the OPTION key.  I chose “Windows” and Linux Mint booted up.  I restarted, launched Linux from rEFIt and it worked.  I don’t know why it did not boot the first time.  Just wanted to point this out in case someone had a similar experience.  I also noticed that the Linux Mint Logo was no present but the five white/green buttons were there.  No problem though, it loads fine.


17.  Install your hardware drivers.  Reboot.  Update your system and you are good to go.  You now have a fully functional MacBook Pro dual-booting Mac OS X and Linux Mint 9!