I just went through the process of getting a vanity call sign. Having gone through it, I wanted to share my experience and provide some tips for those about to undertake this. All of the rules and notes in this post are really for those looking to apply for a 1×2 or 2×1 call sign, where there is significant competition. If you want a 1×3 or 2×2, there is usually not much competition. You can just apply for that call and if you are the only one to apply that day, you will get it.
The process is not clearly defined in a single place. Some sites have better instructions and information than others. Below are the sites I used to understand the process.
Read more: Nuances of Applying for a Vanity Call SignReferences:
https://vanities.k2cr.com/index.html – Great place to see what is coming available, what the competition looks like, your chances of getting your desired call sign, and the process date (the date you find out if you got your desired call sign).
https://www.radioqth.net – Great place to search what call signs are coming available and when.
https://www.ae7q.com/query/ – The OG of vanity call sign websites.
https://wireless2.fcc.gov/UlsEntry/licManager/login.jsp – FCC License Manager. Where you go to apply for your Vanity Call Sign.
https://apps.fcc.gov/cores/userLogin.do – FCC CORES. Where you go to pay your $35 fee.
Read these pages:
Read the pages below to get a detailed understanding of how the process works. I will assume you have read these three pages.
Vanity Application Process: https://www.ae7q.com/query/text/Vanity.php
Vanities Frequently Asked Questions: https://vanities.k2cr.com/faq.html
Vanity Things to Watch For: https://www.radioqth.net/watchout read this and heed it.
Rules:
These are the general rules I came to understand as I went through the process. You need to know these to give yourself the best chance of getting the call you want.
- Call requested must be available on the day you submit.
- If you are requesting a 1×2 or 2×1 call sign (requires AE license), your license must be AE in the License Manager on the day you submit. Passing the test is not enough, the license upgrade must reflect in the license manager on the DAY YOU SUBMIT.
- Call signs for Alaska, Puerto Rico, Virgin Islands, American Samoa, Guam, Hawaii, and the Northern Mariana Islands are location restricted. That means you MUST live there to be assigned one of those call signs.
- Applications that are received on the same date are processed, in random order, ~17 days after the receipt date.
- If you modify an application after you submit, it resets the receipt and process date.
- Receipt dates are on business days. Submissions on weekends and federal holidays are considered received on the next business day. If there are three call signs that you want. One becomes available on Saturday, the second on Sunday, and the third on Monday. Submit your application on Monday when all three are available. Applications submitted on Saturday, Sunday, and Monday are all processed on Monday. If Monday is a federal holiday, they are all processed on Tuesday. Use this to your advantage. If you were to submit the application on Sunday, you would not be eligible for the third call sign because it was not available on the day you submit, even though your application would still be processed on Monday.
- Don’t pay too early. Submit your application and wait a couple of business days. There is no rush. Use https://vanities.k2cr.com/index.html to see what your competition looks like. If you are the only person to submit an application for that call on that day, you will get it.
- If there are not enough call signs that you want, and there is competition, you need to be prepared to “lose” that $35. You pay to play.
- You can have multiple applications open, but they must process on different days. Don’t submit more than one application per day. If you make an error, modify the application on that same day. If you do submit multiple applications on the same day, one of them will be considered a duplicate and ignored. I don’t know how the FCC determines which to ignore.
- If you submit an application and get none of your choices, you keep your old call sign.
Building Your List
If there is a specific call you want, use RadioQTH to find that specific call and when it is available. Then apply for it on that day.
If you want a 1×2 or 2×1 and are flexible and don’t want to wait too long, go to https://vanities.k2cr.com/index.html and look at the “Available Calls.” The calls in green are available and there is NO COMPETITION today. The calls that are underlined indicate that an application was filed for that call but they are green (available) because there was a problem with the request (applied too early, insufficient class, unneeded, etc.). “Unneeded” means that there is an application with that call in it but is ranked so low that the applicant will get one of his higher choices and therefore will not need that call sign.
Here is a screen shot from https://vanities.k2cr.com/index.html on 12-March-2025:
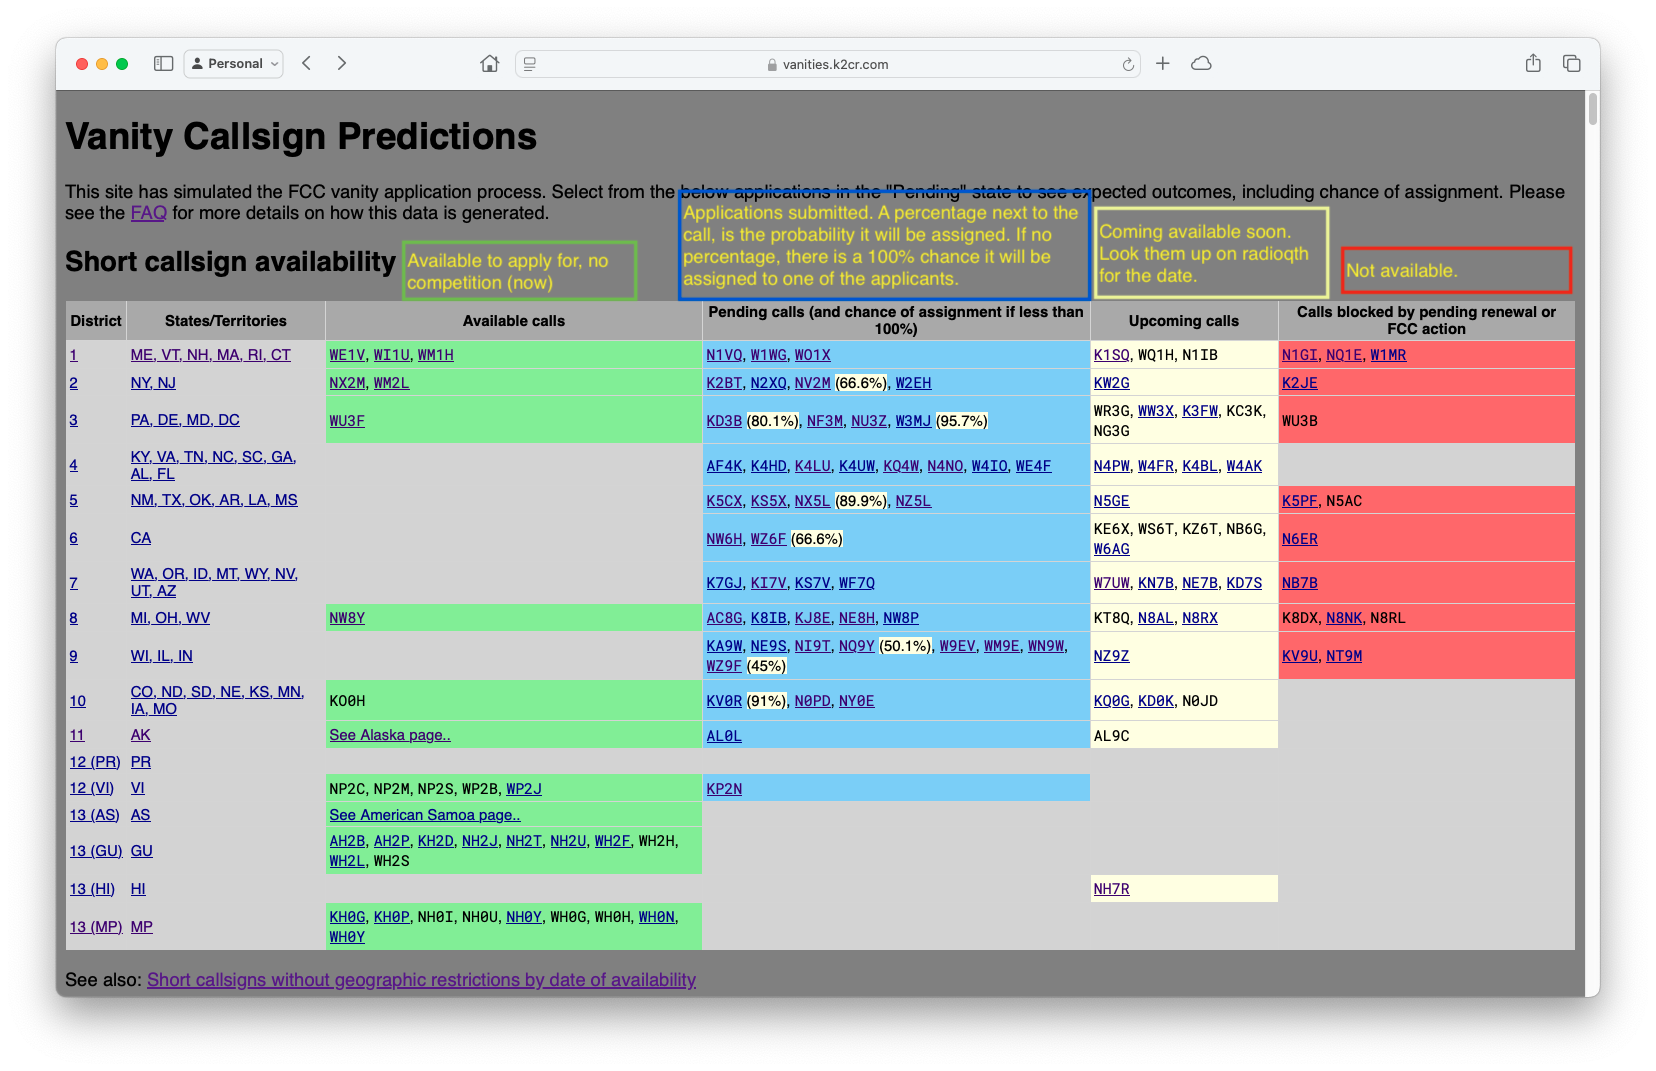
If you those calls are acceptable to you, rank order them from 1-N and submit your application.
- WE1V
- WI1U
- WM1H
- NX2M
- WM2L
- WU3F
- NW8Y
- KO0H
While those might be acceptable, there are other calls in the “Upcoming Calls” section that you want more. Look up the available dates of those calls on https://www.radioqth.net/vanity/available. You find that K1SQ comes available in 7 days and you want it more than the 8 you have already applied for.
While you are waiting for K1SQ to come available, you submitted your first application and the probability of assignment on your application looks like this:
- WE1V 20%
- WI1U 35%
- WM1H 45%
- NX2M Unneeded
- WM2L Unneeded
- WU3F Unneeded
- NW8Y Unneeded
- KO0H Unneeded
This means that you will get one of your top 3 on this list.
Seven days have passed and it is now time to apply for K1SQ. During those seven days, others have applied for your number 4-7 choices on your first application and the probabilities for those call signs is that they will be assigned to someone (meaning they are out of reach for you). You are now too late for those.
You submit a second application:
- K1SQ
- KO0H
- A1BC (came available during the 7 days you were waiting for K1SQ)
On the next business day you see the following probabilities for your second application:
- K1SQ 10%
- KO0H 30%
- A1BC 20%
On this second application there is a 60% chance you will get either K1SQ, KO0H, or A1BC and a 40% chance you will get nothing and keep your old call sign.
Decision time: Which one do you pay for?
- Pay for first and get WE1V, WI1U, or WM1H.
- Pay for second application and risk your $35 for a 10% chance to get your number 1 choice, a 30% for your 8th choice, a 20% chance for your 9th choice, and a 40% chance you get nothing.
Why not only apply for K1SQ on the second application and pay for both?
Because when your first application is approved and you get WM1H, your old call is no longer valid. Therefore, your second application for K1SQ will turn red as an “Inactive Call.”
Bottom Line: pay for the one application that gives you the best chance of success based on your preferences and risk tolerance.
Conclusion
I hope that this has been helpful to you. Good luck on your application. I made a few mistakes along my journey. If you see any errors, please let me know and I will make a correction. I don’t plan on doing this again.
KZ6M

