Introduction
GMC’s flawed execution of wireless charging rendered the wireless charger in my 2017 Canyon Denali useless for charging my iPhone X. Luckily, the 2018 GMC Sierra charger can be retrofitted into the 2017 Canyon with a few modifications.
Required Items
- GMC Silverado Wireless Charger, part number 13521066. I purchased from gmpartsdirect.com and they did NOT require a Silverado VIN.
- T15 Torx Screwdriver
- Plastic Trim Removal Tools
- Dremel Tool with cutting bit and sanding bits.
- Black Electrical Tape
- Adapter harness from pgamboa on gm-trucks.com. Phil was great to work with. Send him a private message on gm-trucks.com to order.
Continue reading for the instructions.
Release the Center Console
- Start by removing the back side of the console. There are four clips. Pop them off and just pull it back. Keep the wires connected.
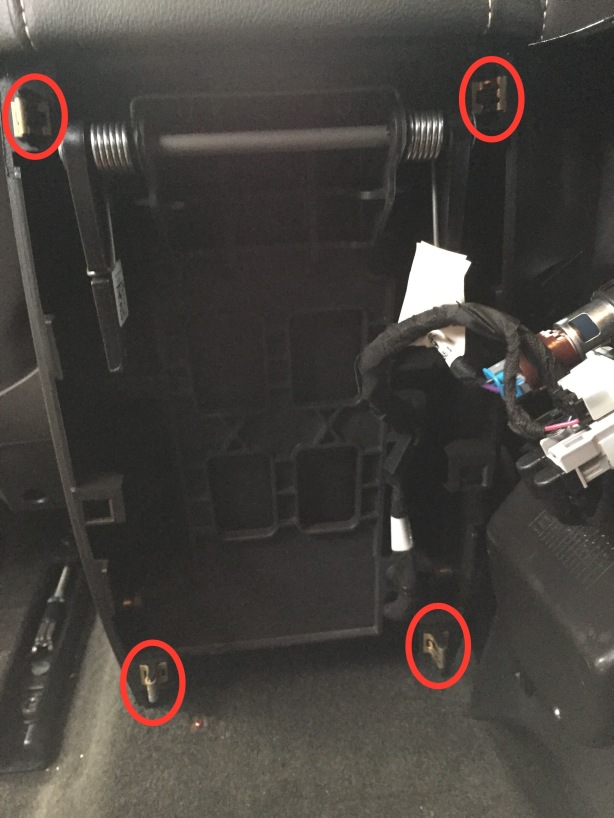
Four clips on rear of console. This is the view from the back seat.
- Remove the gear shifter trim. Pull out the rubber cup holder. Then pop the six clips on the gear shifter trim using your trim removal tools. Remove and set aside.
Gear shift trim. Six clips.
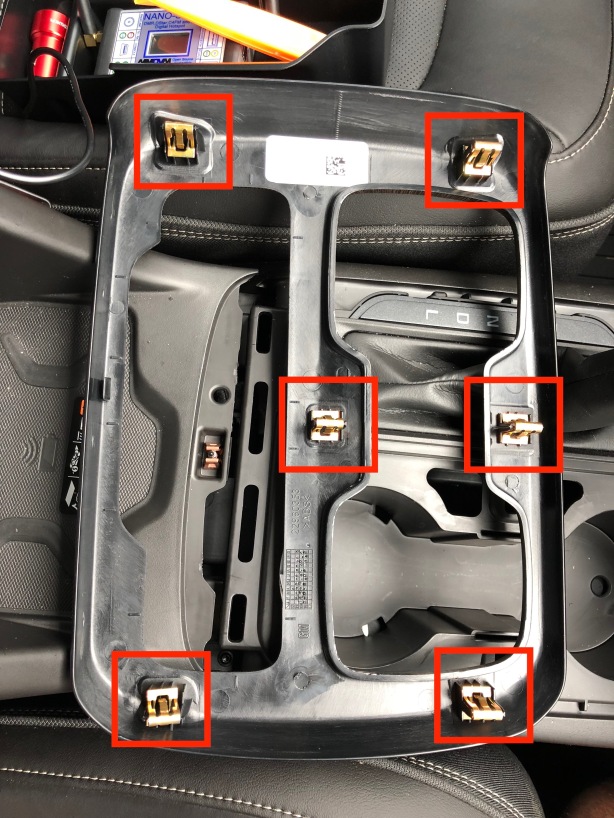
- Pop the clips on the center console; there are eight of them. Start with the two in back. Then work your way forward along both sides. Do not remove.

Eight retention clips on the center console. Start from the back and move forward.
Disconnect Wiring Harnesses
There are four wiring harness connections in the center console. Removing them is kind of a pain.
- Disconnect the wire retention plug. This is just a plastic retaining plug. Just pull down and it will come out to give you more room to work.

Pull Retention Clip Out of Here
- Disconnect the USB cable. Push down on the tab and pull it straight down.
- Disconnect the wireless Charger. Push on the tab and pull straight out.
- Disconnect the Wireless Charging LED. There are tabs on either side. Pull them outwards and the LED light will drop straight down.

Wireless Charger LED.


Once these are disconnected you can now lift the center console out.
Remove Old Charger.
- Using a T15 Torx screwdriver, remove the screw and lift the old charger out.
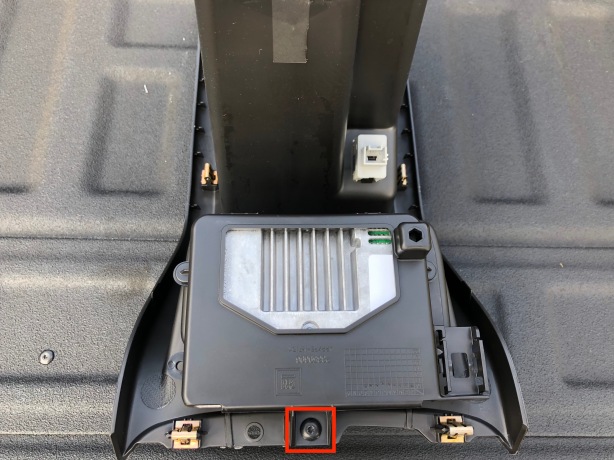
Use a T15 Torx to remove this screw.
Adapt the charger tray to fit the new wireless charger
The old and new chargers are not the same shape. You will have to cut the tray to fit the new charger.
- Use a dremel tool to grind the rear support tab. I took too much out but it did not negatively affect anything. Grinding out about 1/4″ – 1/2″ should work. Use the old and new charger to determine how much you need to grind out.
- Use a dremel tool to cut out a slot to enable the new charger to fit in the tray. This will take a little trial and error.

Modify the retention tray to fit the new charger.
Install new charger and test fitment.
- Install the new charger in the tray and then assemble and screw into the center console. Check fitment. Mine had a little bit of vertical play. I used black electrical tape around the tabs to tighten it up. I took a piece about 1 1/2″ long, cut it length wise and then wrapped each around the tab. This eliminated any wobble and ensured the charger was pressed against the top of the charging tray.
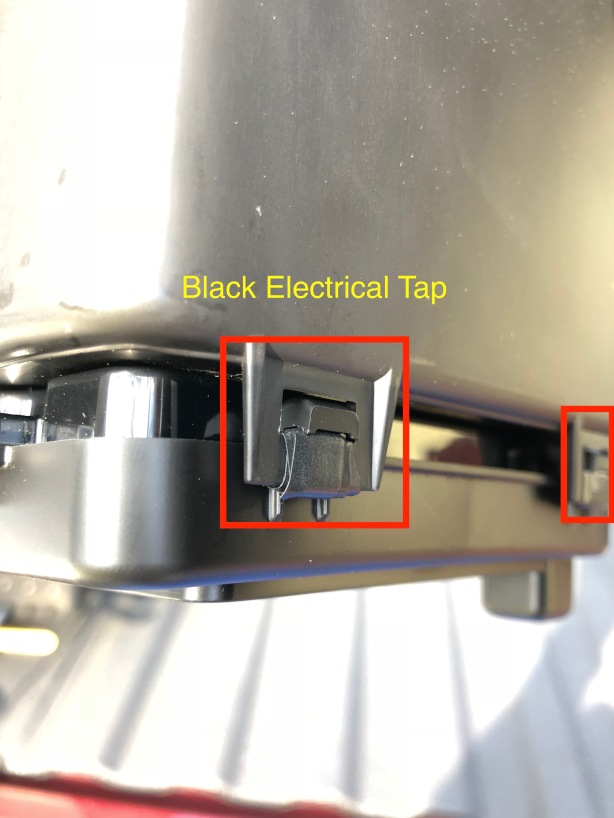
Black electrical tape on the tabs to keep it nice and tight with now wobble.
Put Everything Back together and test.
- Connect the USB port.
- Connect the adapter harness to the charger and truck wiring harness.

Adapter Harness from pgamboa on gm-trucks.com.
- Reinstall the LED and lock into place. TIP: Use a flashlight to shine light up towards the LED. This will make it very easy to get the LED lined up to the hole. Then just push upwards and it will snap in place.
- Snap in the wire retention plug.
- Turn the truck on and place your phone on the charger. The light should turn green and your phone should say it is charging.
- Verify your USB cable is properly attached by plugging a USB cable into to the center console and plug your phone in. The phone should start charging and CarPlay should activate.
Button Up
- Snap the center console in by firmly hitting each of the retention clips until they snap in.
- Reinstall the gear shift cover and cup holder insert.
- Snap in the rear panel.

iPhone X with Incipio Case fits perfectly.
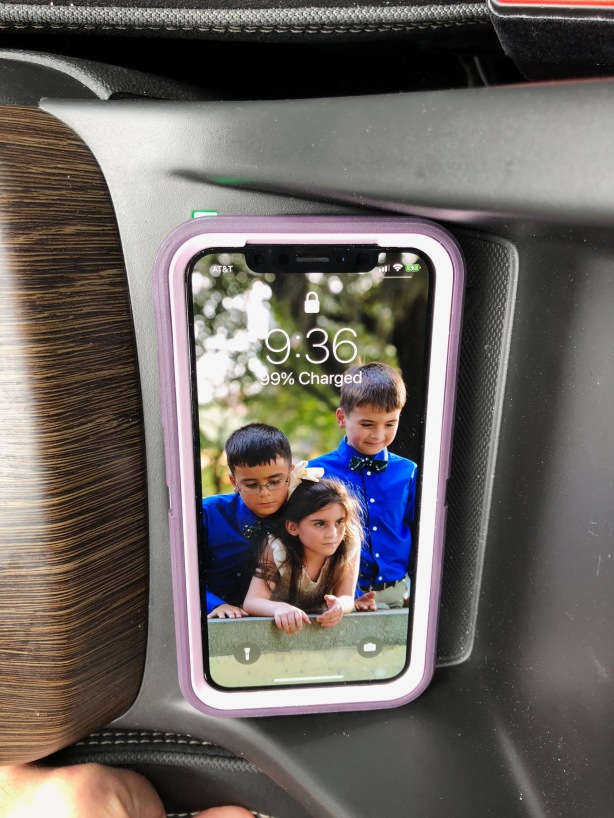
iPhone X with Otterbox Defender charges but doesn’t fit perfectly.
Conclusion
Going slowly and deliberately, this took me about an hour to complete. Now that you have some instructions, it shouldn’t take you much time at all.
If you have a phone larger than an iPhone X, it will probably not fit perfectly on the pad but still may charge.
I have the Incipio NGP pure (clear) on my phone, which fit perfectly.
My wife has an Otterbox Defender which did not fit but still charged.
I am glad I did this. I love having wireless charging.

Nice instructions. Temped to try on my 2018 Canyon Denali. Do you know if you need the same parts and are the procedures the same? Thanks, Greg
LikeLike
Greg, I think so. However, I found an article that says there is a new retrofit kit that is plug and play. I cannot vouch for its veracity but definitely worth a look. https://sandyblogs.com/techlink/?p=9762
LikeLike
Hi John: I ordered GM p/n 84526978 which contains the module and the cable. Its supposed to be Plug and Play. I give you an update once have it installed.
I have to admit I am a bit nervous pulling the plastics apart.
regards, Greg.
LikeLike
The instructions perfectly on my 2018 Canyon Denali. I purchased GM p/n 84526978 which included the module and the wiring harness. Thanks again, regards, Greg
LikeLiked by 1 person
Your welcome Greg!
LikeLiked by 1 person
I have a 2017 Chevrolet Colorado Z71, and I bought all these items and was going to have my friend install it. He said my truck did not come with the wiring to plug the harness in that I got from Phil. Is there a way to get that or am I out of luck? Thank you!
LikeLike
If your truck did not have a wireless charger to start with, you are out of luck. Unless you buy a new center console with the charging mat and figure out a way to wire it up.
LikeLiked by 1 person
Yeah I bought the new center console that has the wireless charging mat with the old module. I bought the new module and wiring harness from Phil. I guess I’ll figure out a way to wire it up or if not try to sell all of it. Thank you!
LikeLiked by 1 person
Great instructions. Did it on a 2018 Canyon and wa what I needed. Thank you!
LikeLiked by 1 person
Thanks for the great write up. I installed on my 2018 ZR2 yesterday. This sure made it easy
LikeLiked by 1 person
Great write up – I am attempting to add this to my 2016 Colorado which did not come with wireless charging and doesn’t have the power able for it
trying to determine if the LED is connected to the wiring harness, as it looks like it doesn’t come with the charging module or the module bracket.
I found a wiring harness for an automatic with wireless charging for the center console and assuming if I swap that *maybe* it comes with the LED and power?
LikeLike
I’m not sure. If it doesn’t, you could order the LED. You will likely need to buy a new console that has the cut out for the LED, and the bracket.
LikeLike
I did get the new wireless style console “bucket” that has the hole for the LED – working on getting the module and module bracket next – just was curious about the LED since it doesn’t come with the module, the bracket, or the bucket – so was guessing maybe its part of the harness?
LikeLike